
Home / Blog Center / Chargers / Installing a Flip-Top Shoe Rack: What You Need to Know
Installing a Flip-Top Shoe Rack: What You Need to Know
03/07/2025 | OtterOasis
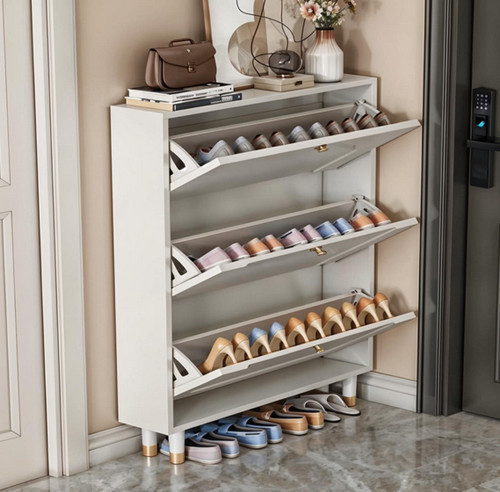
In cutting-edge households, shoe shelves are an crucial piece of furniture that no longer simplest provide realistic garage space but additionally beautify the aesthetic of the home environment. With the changing life of human beings, turn shoe cabinets have turn out to be more and more popular because of their particular layout and green area utilization. So, what is the set up technique for a shoe cabinet flip rack?
set up technique for a Shoe cabinet flip Rack:
1. prepare equipment and substances
before starting the set up of the flip rack, you want to put together the essential equipment and substances. not unusual equipment encompass an electric powered drill, screwdriver, level, measuring tape, and hammer; materials encompass the turn rack body, connection pieces, screws, and hinges. test that every one materials are whole and ensure that the size of the turn rack suit the reserved space to keep away from pointless problems later.
2. measure and Mark
After figuring out the installation place, the next step is to measure and mark. Use a measuring tape to degree the inner dimensions of the shoe cupboard to ensure that the turn rack can fully utilize the cupboard space. you could gently draw a immediately line at the side wall or backside of the shoe cupboard as a reference line for putting in the flip rack, ensuring that the subsequent installation is more particular. throughout this method, keep it level, and it’s first-class to use a stage to check, fending off any mistakes that might reason the flip rack to tilt.

3. installation the base
once you have marked the location, you may start installing the base of the turn rack. First, location the bottom on the marked immediately line, then use an electric powered drill to make holes on the pre-marked spots, paying attention to the depth and attitude of the holes. next, at ease the bottom to the facet wall or backside of the shoe cupboard with screws, making sure it is steady. This step paperwork the muse of the installation; the firmness of the base directly influences the usability of the turn rack.

4. set up the flip Rack frame
After the base is set up, the following step is to put in the frame of the turn rack. generally, the flip rack body will have a hinge layout, and also you want to cautiously align it with the bottom at some point of connection. make certain the hinge is flexible to facilitate future flipping operations. Use screws to cozy the flip rack, making sure it is solid and would not wobble. If the flip rack has an adjustment characteristic, it could be adjusted presently to obtain the first-rate utilization top and attitude.
5. check and regulate
After completing the set up of the turn rack, it's far encouraged to conduct a thorough check to verify that it opens and closes smoothly and is securely fixed. at some point of the take a look at, pay attention to any unusual noises and whether there are any sticking issues. If troubles are determined, cautiously test the installation regions and make changes as necessary to make certain the protection and luxury of the use of the flip rack.
6. organize and save
The final step after finishing the set up of the flip rack is to tidy up and organize the shoe cabinet. location footwear in the flip rack in an organized way, making properly use of every flip compartment. you may categorize them with the aid of season, coloration, or frequency of use to make retrieval extra convenient. A nicely-prepared shoe cabinet not only keeps it tidy however additionally extends the lifespan of the shoes.
In summary:the content above stocks the installation technique for a shoe cupboard flip rack, hoping to help you. For more related knowledge, please maintain to observe our internet site, where we will gift more thrilling content material within the destiny.